# Deploying Updates
NOTE
This documentation is the same for both the customer and clerk applications.
You can either deploy the update over-the-air (OTA) or submit a build a new version of the standalone app and re-submit to app stores.
Jump to instructions:
If you are unsure which method to use, carefully read the guidelines below.
# Updating OTA vs. submitting a new build
Over-the-air (OTA) updates allow you to publish a new version of your app JavaScript and assets without building a new version of your standalone app and re-submitting to app stores.
Not all updates can be submitted OTA. There are several limitations with OTA updates, including many changes in app.json. You can read more about the limitations of OTA updates here (opens new window). Additionally, rollout and adoption of OTA updates can be unreliable. Err on the side of caution when deciding whether to make an OTA update or submit a new build.
# When to update OTA
- Backwards-compatible bug fixes: features where the app would remain usable for those with or without the latest update
- ex. front-end additions with store details and store hours in v1.1_tag_updates (opens new window)
- Minor time-sensitive changes
- ex. Healthy Corners requested adding 500 bonus points for signing up to help the Nam's Market launch in v1.2.0_signup_bonus (opens new window), which also includes several visual bug fixes
- Airtable schema updates: breaking if not updated immediately. More details here.
# When to submit a new build
Backwards-incompatible breaking changes
- ex. all passwords had to be changed in Airtable for #130 Implement basic encryption for passwords (opens new window). If users had not recieved the OTA update, they would not be able to access their accounts
Modifications in
expo.iosorexpo.androidinapp.json- Learn more about specific limitations in the Expo Docs (opens new window)
- ex. adding Firebase configuration in #88 Firebase integration + Analytics (opens new window)
# Option A. Updating OTA
Over-the-air (OTA) updates allow you to publish a new version of your app JavaScript and assets without building a new version of your standalone app and re-submitting to app stores.
# Set up your release branch
Create a new branch from the most up-to-date version of
mainnamedreleasewith the update version number using Semantic Versioning (opens new window) guidelines. For most updates, it is recommended to only increment the PATCH version.git checkout -b release-1.1.2Bump the
expo.versionnumber inapp.jsonwith the new SemVer version number.{ "expo": { ... "version": "1.1.1", // would become "1.1.2" ... } }
# Publish with Expo
- In your release branch, run
expo publish --release-channel prod - Once the update finishes processing, the latest updates should appear within the app. If changes do not appear immediately, close and reopen the app.
Once the OTA update is successfully published, skip the next section and jump to Merge release changes.
# Option B. Submitting a new build
# Set up your release branch
Create a new branch from the most up-to-date version of
mainnamedreleasewith the update version number using Semantic Versioning (opens new window) guidelines.git checkout -b release-1.1.0Bump the following version numbers in
app.json- Increment
versionandbuildNumberbased on Semantic Versioning (opens new window) guidelines versionCodemust be an integer. Increment this for each release.
{ "expo": { ... "version": "1.0.1", // would become "1.1.0" ... "ios": { ... "buildNumber": "1.0.1", // would become "1.1.0" ... }, "android": { ... "versionCode": 2 // would become 3 }, ... } }- Increment
# Helpful Links
Expo Docs: Configuration with app.json (opens new window)
# iOS - App Store
Follow these instructions for both apps.
As of Fall 2020, the Clerk app is also xavailable on iOS on the Apple App Store. Make sure all updates to the Clerk app are made for both iOS and Android.
# Start the Expo Build
- In the Expo CLI, run
expo build:ios --release-channel prod - When prompted, select
archive - Enter Apple ID credentials
Once the build starts, it can take anywhere from a few minutes to a several hours, depending on how much traffic there is. You can check the build status in your Expo Dashboard, or monitor the queues in Expo's Turtle status site (opens new window).
# Upload for iOS
Once the build is complete, run expo upload:ios in the Expo CLI. You will be prompted to enter your developer Apple ID credentials.
Alternatively, you can download the .IPA file from the Expo dashboard and upload it to TestFlight using Transporter from the App Store (link (opens new window)). Learn more about manually uploading from Expo Docs (opens new window).
# Test on TestFlight
Once you have uploaded the build, you can check the status of your app submission to TestFlight in App Store Connect:
- Login to App Store Connect (opens new window) with your Apple ID credentials
- Select My Apps and you should see your app listed.
- Select TestFlight from the to menu bar.
This will show your current app builds that are available for testing. To test the app on your device, you will need to install the TestFlight iOS app from the App Store, and sign in using your Apple ID.
# Create a new Version in App Store Connect
Sign in to the developer account in App Store Connect (opens new window)
Go to My Apps and select Healthy Corners (customer app) or Healthy Corners Clerk
Under the App Store tab on the left menu bar, select + Version or Platform, and select iOS from the dropdown
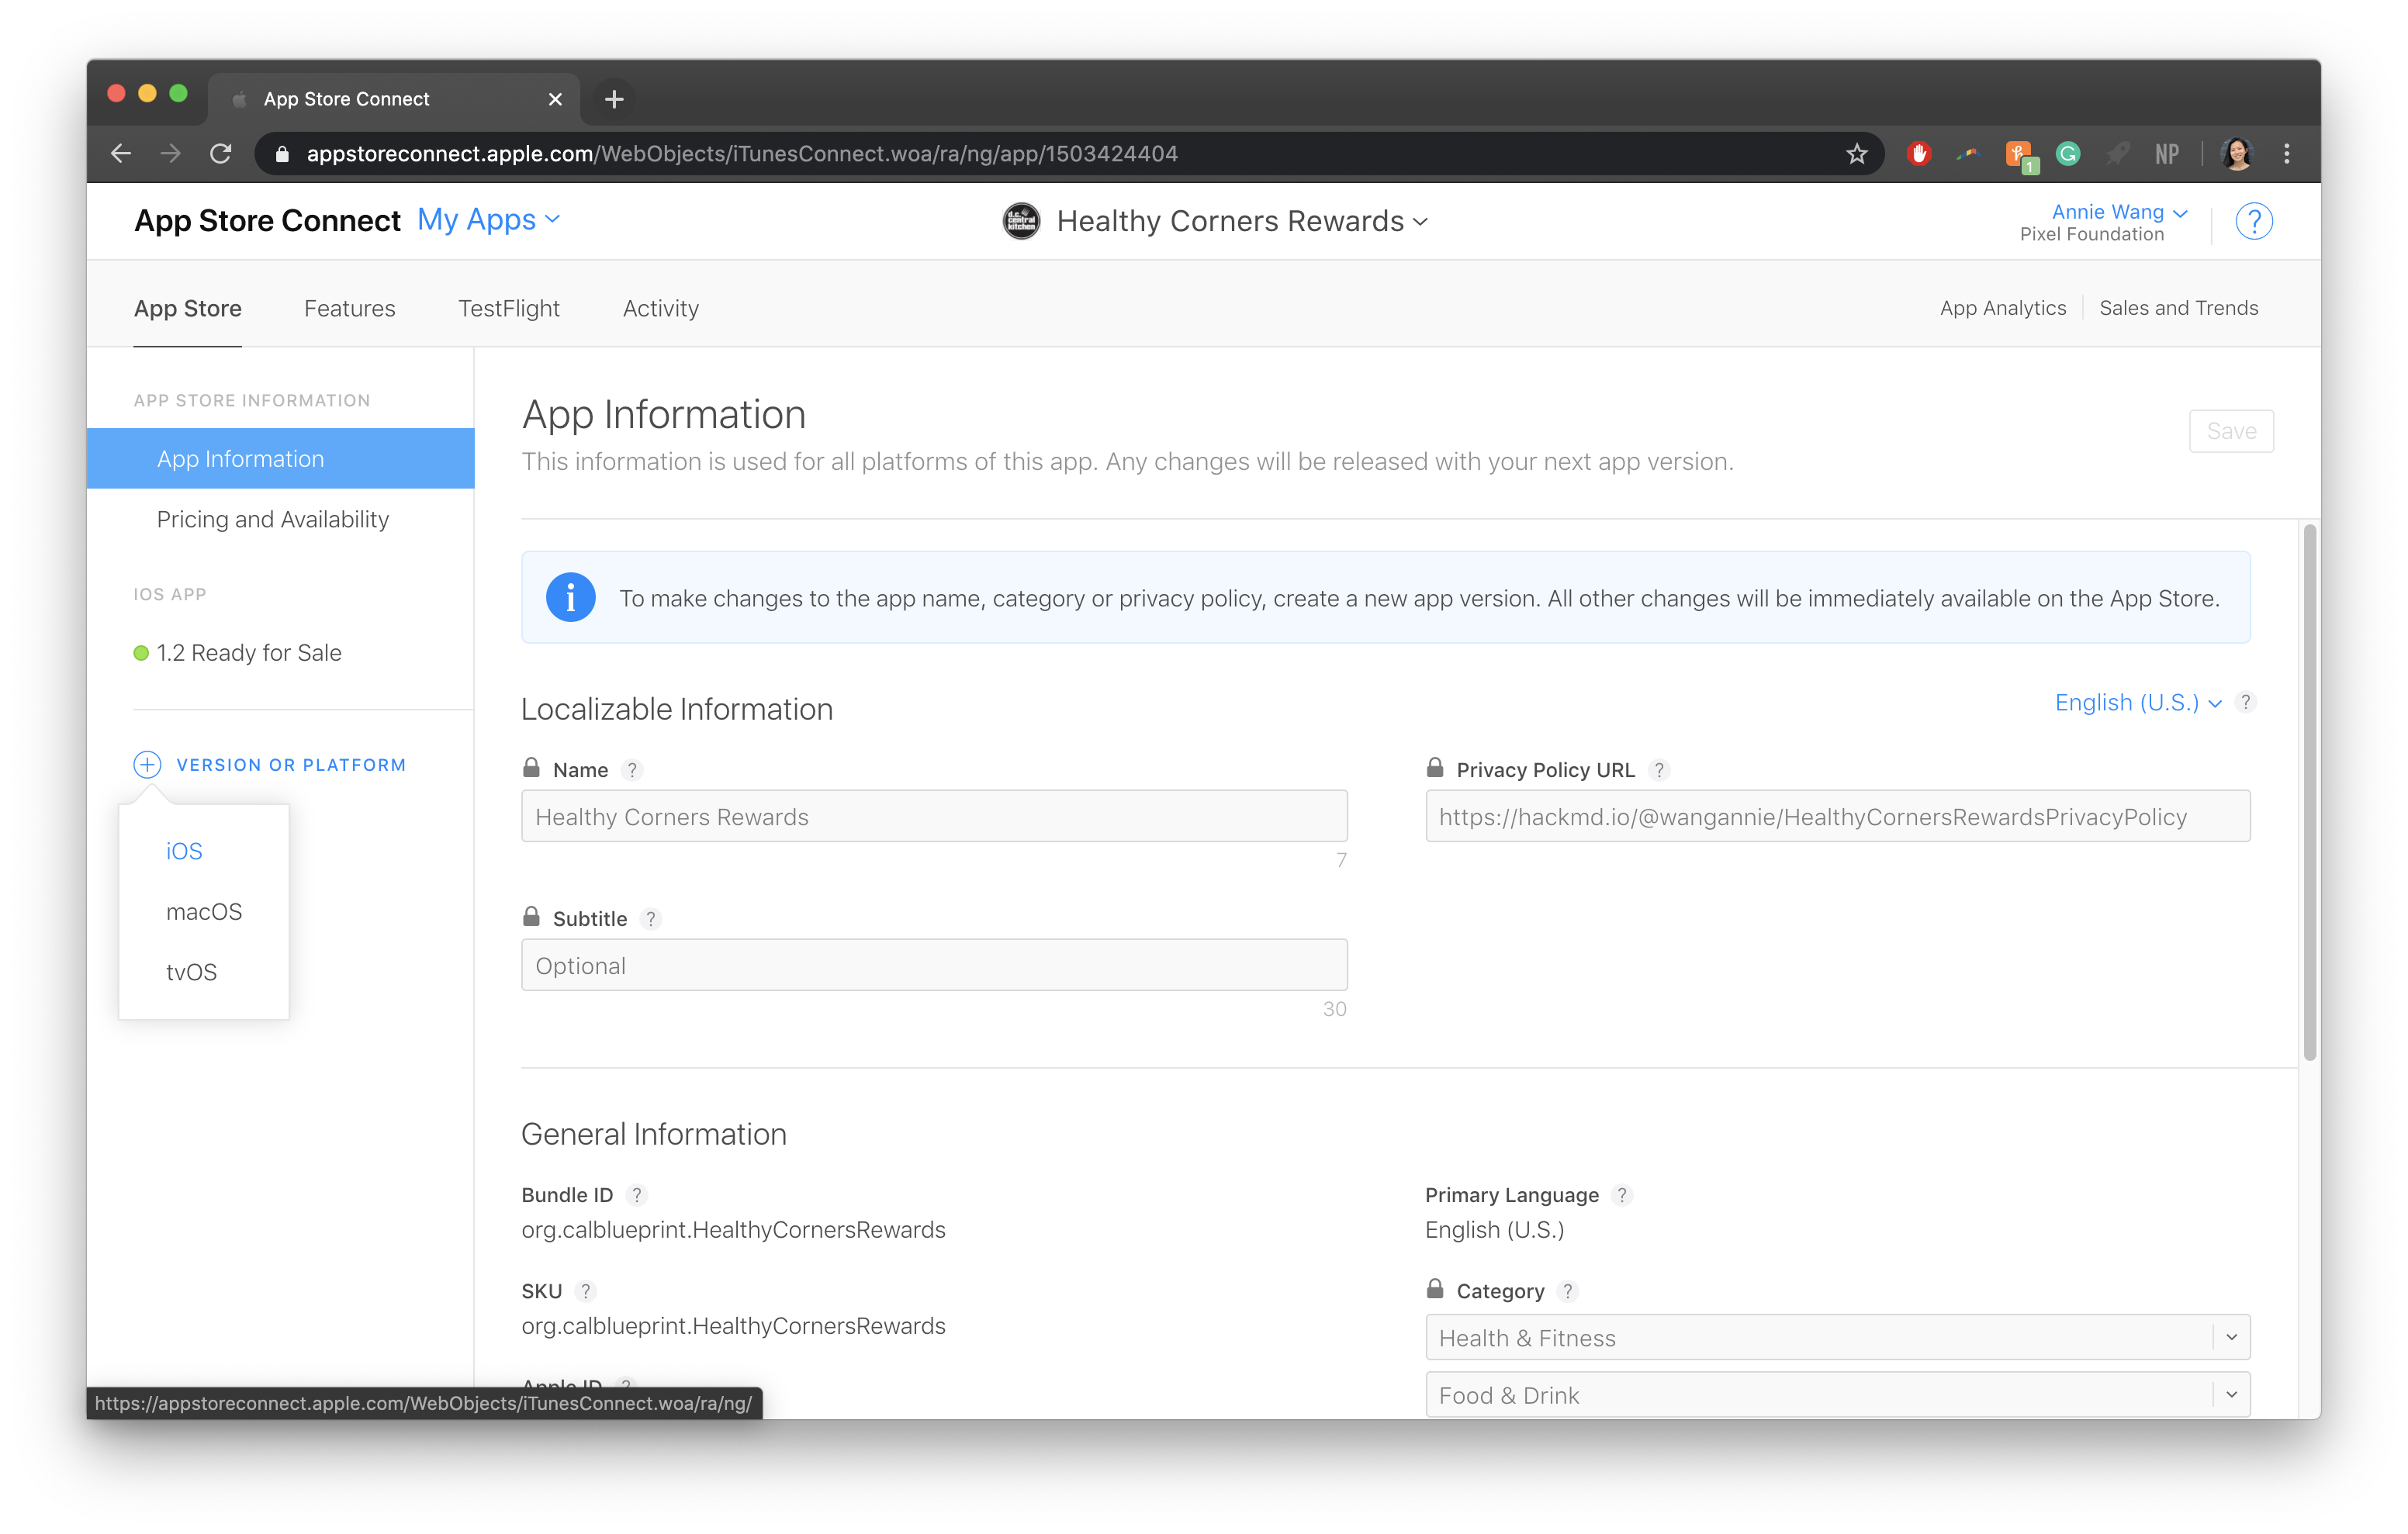
Update Version Information
What's New in This Version: describe any updates related to this version in up to 4000 characters.
- Customer v1.2 example
• The all-new Guest Mode allows you to use all of the store locator features without creating an account. Just tap 'Continue without an account' and start finding affordable healthy food!
• The Crisis Response section in Resources provides links to keep you up to date with local emergency food resources and meal sites.
• The new Stores display includes more detailed product information and the most updated prices.
• The redesigned Points History displays more comprehensive information about your points earnings.
• Easily get navigation directions to a store in a map app of your choice by tapping the store's address.
• The redesigned map icons and labels help speed up your store search by helping you select stores from the map at a glance.
• Security updates, small improvements, and bug fixes.
- Customer v1.2 example
App Previews and Screenshots: Upload new app screenshots if necessary to reflect any major new features or visual changes. You can take these screenshots using
cmd+sin an iOS simulator in devices of the proper dimensions. See Apple's guidelines here. (opens new window)
TIP
Follow this guide on updating app screenshots to use the styled screenshot frames.
Past versions of app screenshots are included in Dropbox here.
- Description: Update the app description if there are any major new features or updates. This should not need to change much for smaller updates.
# Helpful Links
- Expo Docs: Building Standalone Apps (opens new window)
- Expo Docs: Uploading Apps to the Apple App Store and Google Play (opens new window)
- App Store Connect Help: App Store icon, app preview, and screenshots overview (opens new window)
# Android - Google Play
Follow these instructions for both apps
Both the customer-facing and clerk-facing apps are deployed in the Google Play Store.
# Start the Expo Build
- In the Expo CLI, run
expo build:android --release-channel prod - When prompted, select
apk
Once the build starts, it can take anywhere from a few minutes to a several hours, depending on how much traffic there is. You can check the build status in your Expo Dashboard, or monitor the queues in Expo's Turtle status site (opens new window).
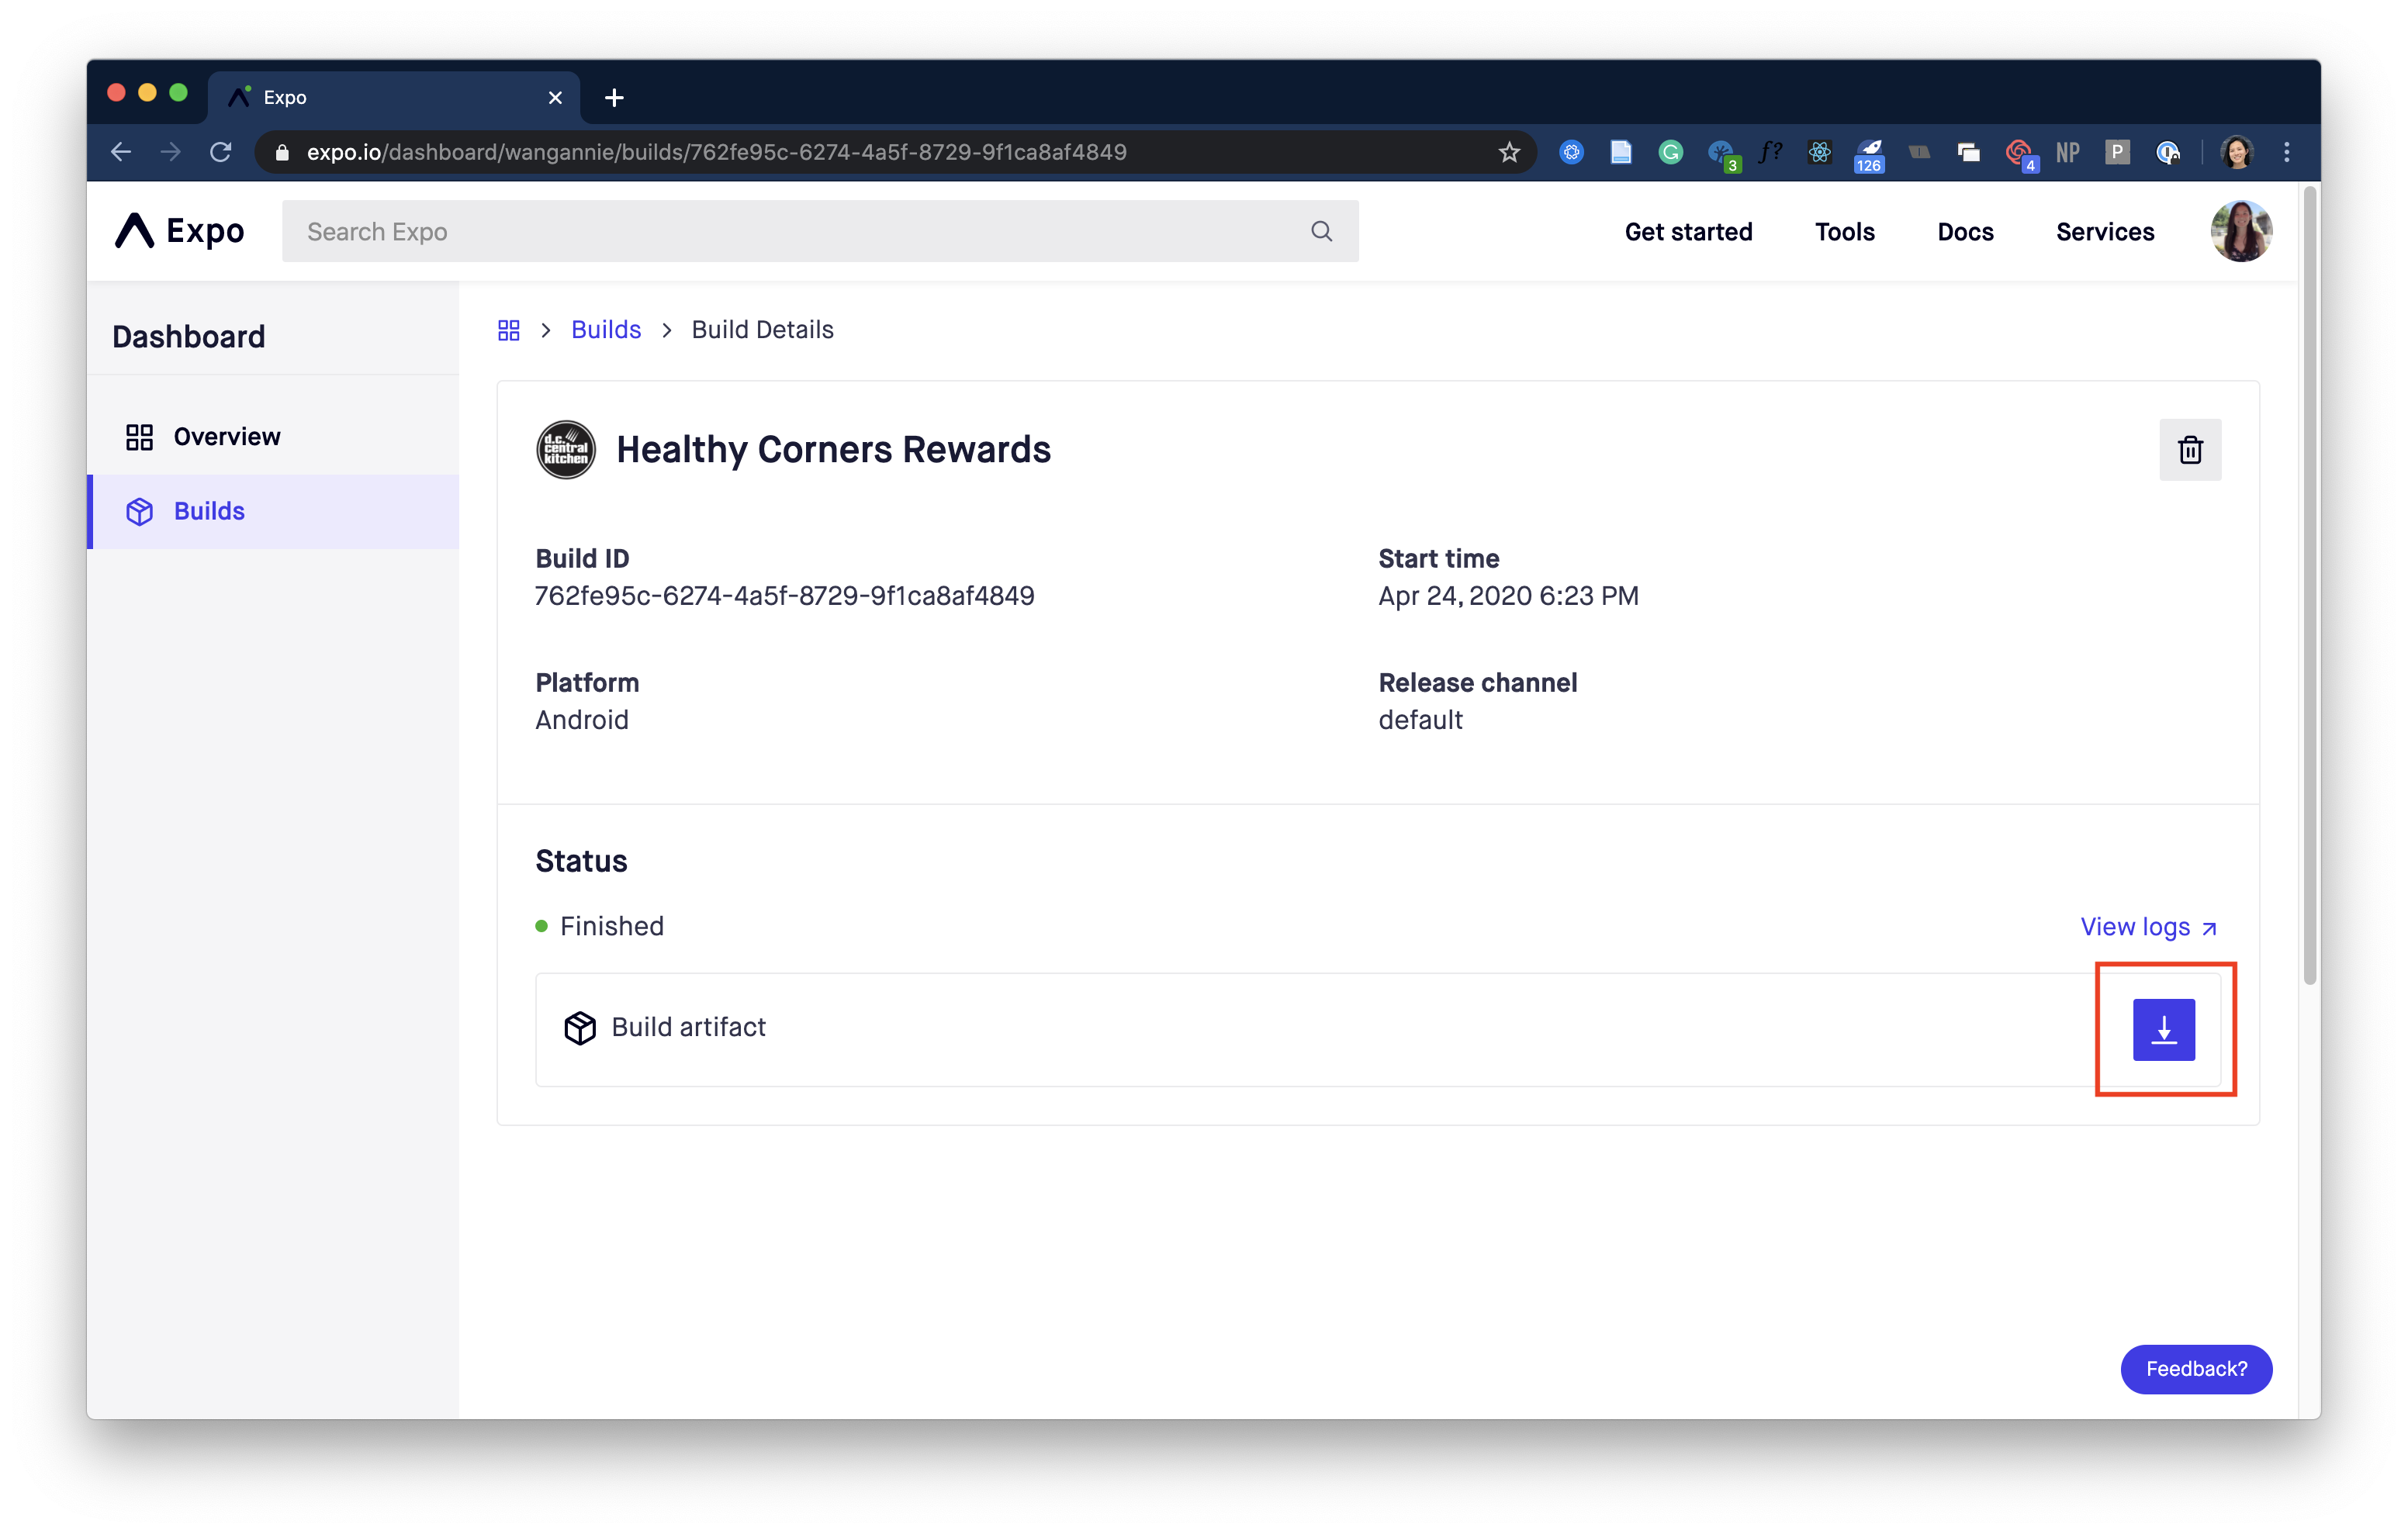
# Upload for Android
Once the build is complete, click the link in the command line or go to your Expo dashboard, select the build, and download the Build artifact (APK).
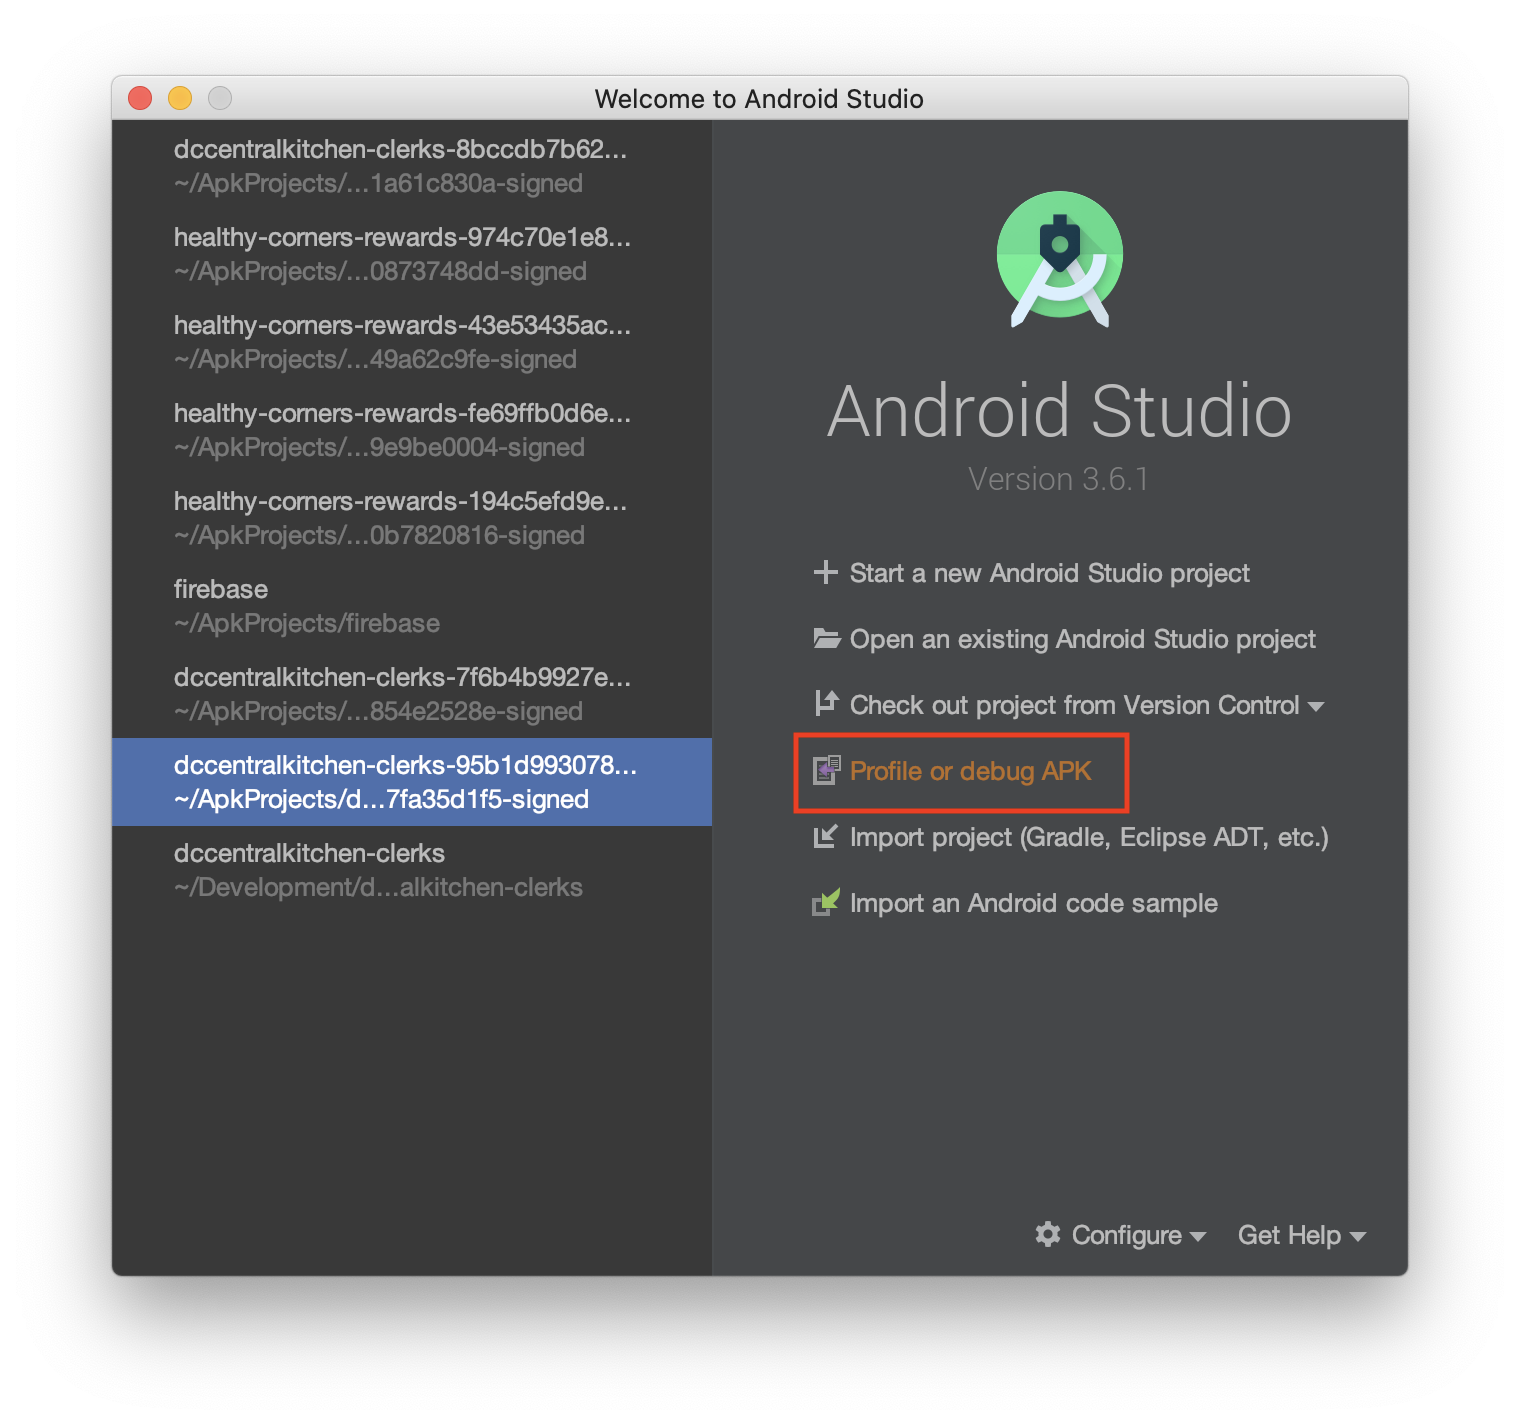
# Test the APK
If you have Android Studio with an emulator or virtual device, select Profile or debug APK to run the APK on a virtual device.
Android Docs: Run apps on the Android Emulator (opens new window)
TIP
If you don't have an Android Emulator, upload the APK to Appetize (opens new window) to test it on an Android device online for free.
# Create a new Release in the Google Play Console
- Go to the Google Play Console (opens new window) and sign in
- Select either Healthy Corners (customer-facing app) or Healthy Corners Clerk (clerk-facing app) from All Applications
- From the menu on the left, open Release management and select App releases
- Under Production track select Manage on the right
- Select Create Release on the top right.
- Upload the APK downloaded from Expo
- Name the release with the version code and a brief description.
- ex.
v1.2.0 - Password Security Updates
- ex.
- Add release notes
- Customer v1.2 example:
- New Crisis Response section in Resources provides links to keep you updated with emergency food resources and meal sites
- All-new Guest Mode allows you to use all of the store locator features without creating an account. Tap 'Continue without an account' and start finding affordable healthy food
- The new Stores display includes more detailed product information and the most updated prices
- Get navigation directions to a store in a map app by tapping the store's address
- Security updates
- Customer v1.2 example:
- Select Review. On the "Review and roll out release" screen, make sure there aren't any issues.
- Select Confirm rollout
# Update the Store listing
If there are any major updates that would require updating any of the following information, see Play Console: Manage your store listings (opens new window)
- Title
- Description
- Graphic assets (icons, screenshots)
TIP
Since Android screenshot guidelines are more flexible, we usually use the same screenshots that we use for the Apple App Store.
Follow this guide on updating app screenshots to use the styled screenshot frames.
Past versions of app screenshots are included in Dropbox here.
- Categorization (categories, tags)
- Contact details
# Helpful Links
- Expo Docs: Building Standalone Apps (opens new window)
- Google Play Console: Prepare & roll out releases (opens new window)
# Merge release changes
Once the update is successfully deployed, merge the release branch into main to update any hotfixes and version numbers.
# Track the Release in GitHub
It is easy to lose track of which changes are included with which updates, and whether those updates were delivered OTA or through new builds. Releases in Github are good for organizing and documenting releases.
# Tag the Release
In your release branch, mark the release point using a tag with the SemVer version code from
expo.versioninapp.json$ git tag v1.2.0For updates where the version number does not change, note what the specific change is within the tag name.
$ git tag v1.2.0_signup_bonusPush the tag using
git push origin <tagname>$ git push origin v1.2.0_signup_bonusMore on Git Tagging (opens new window)
# Create a Release from the tag
This is optional but highly recommended to track bigger releases including more major feature changes.
- Go to the Tags within the Releases page in the customer (opens new window) or clerk (opens new window) repo
- Select the
•••menu by the latest tag and select Create release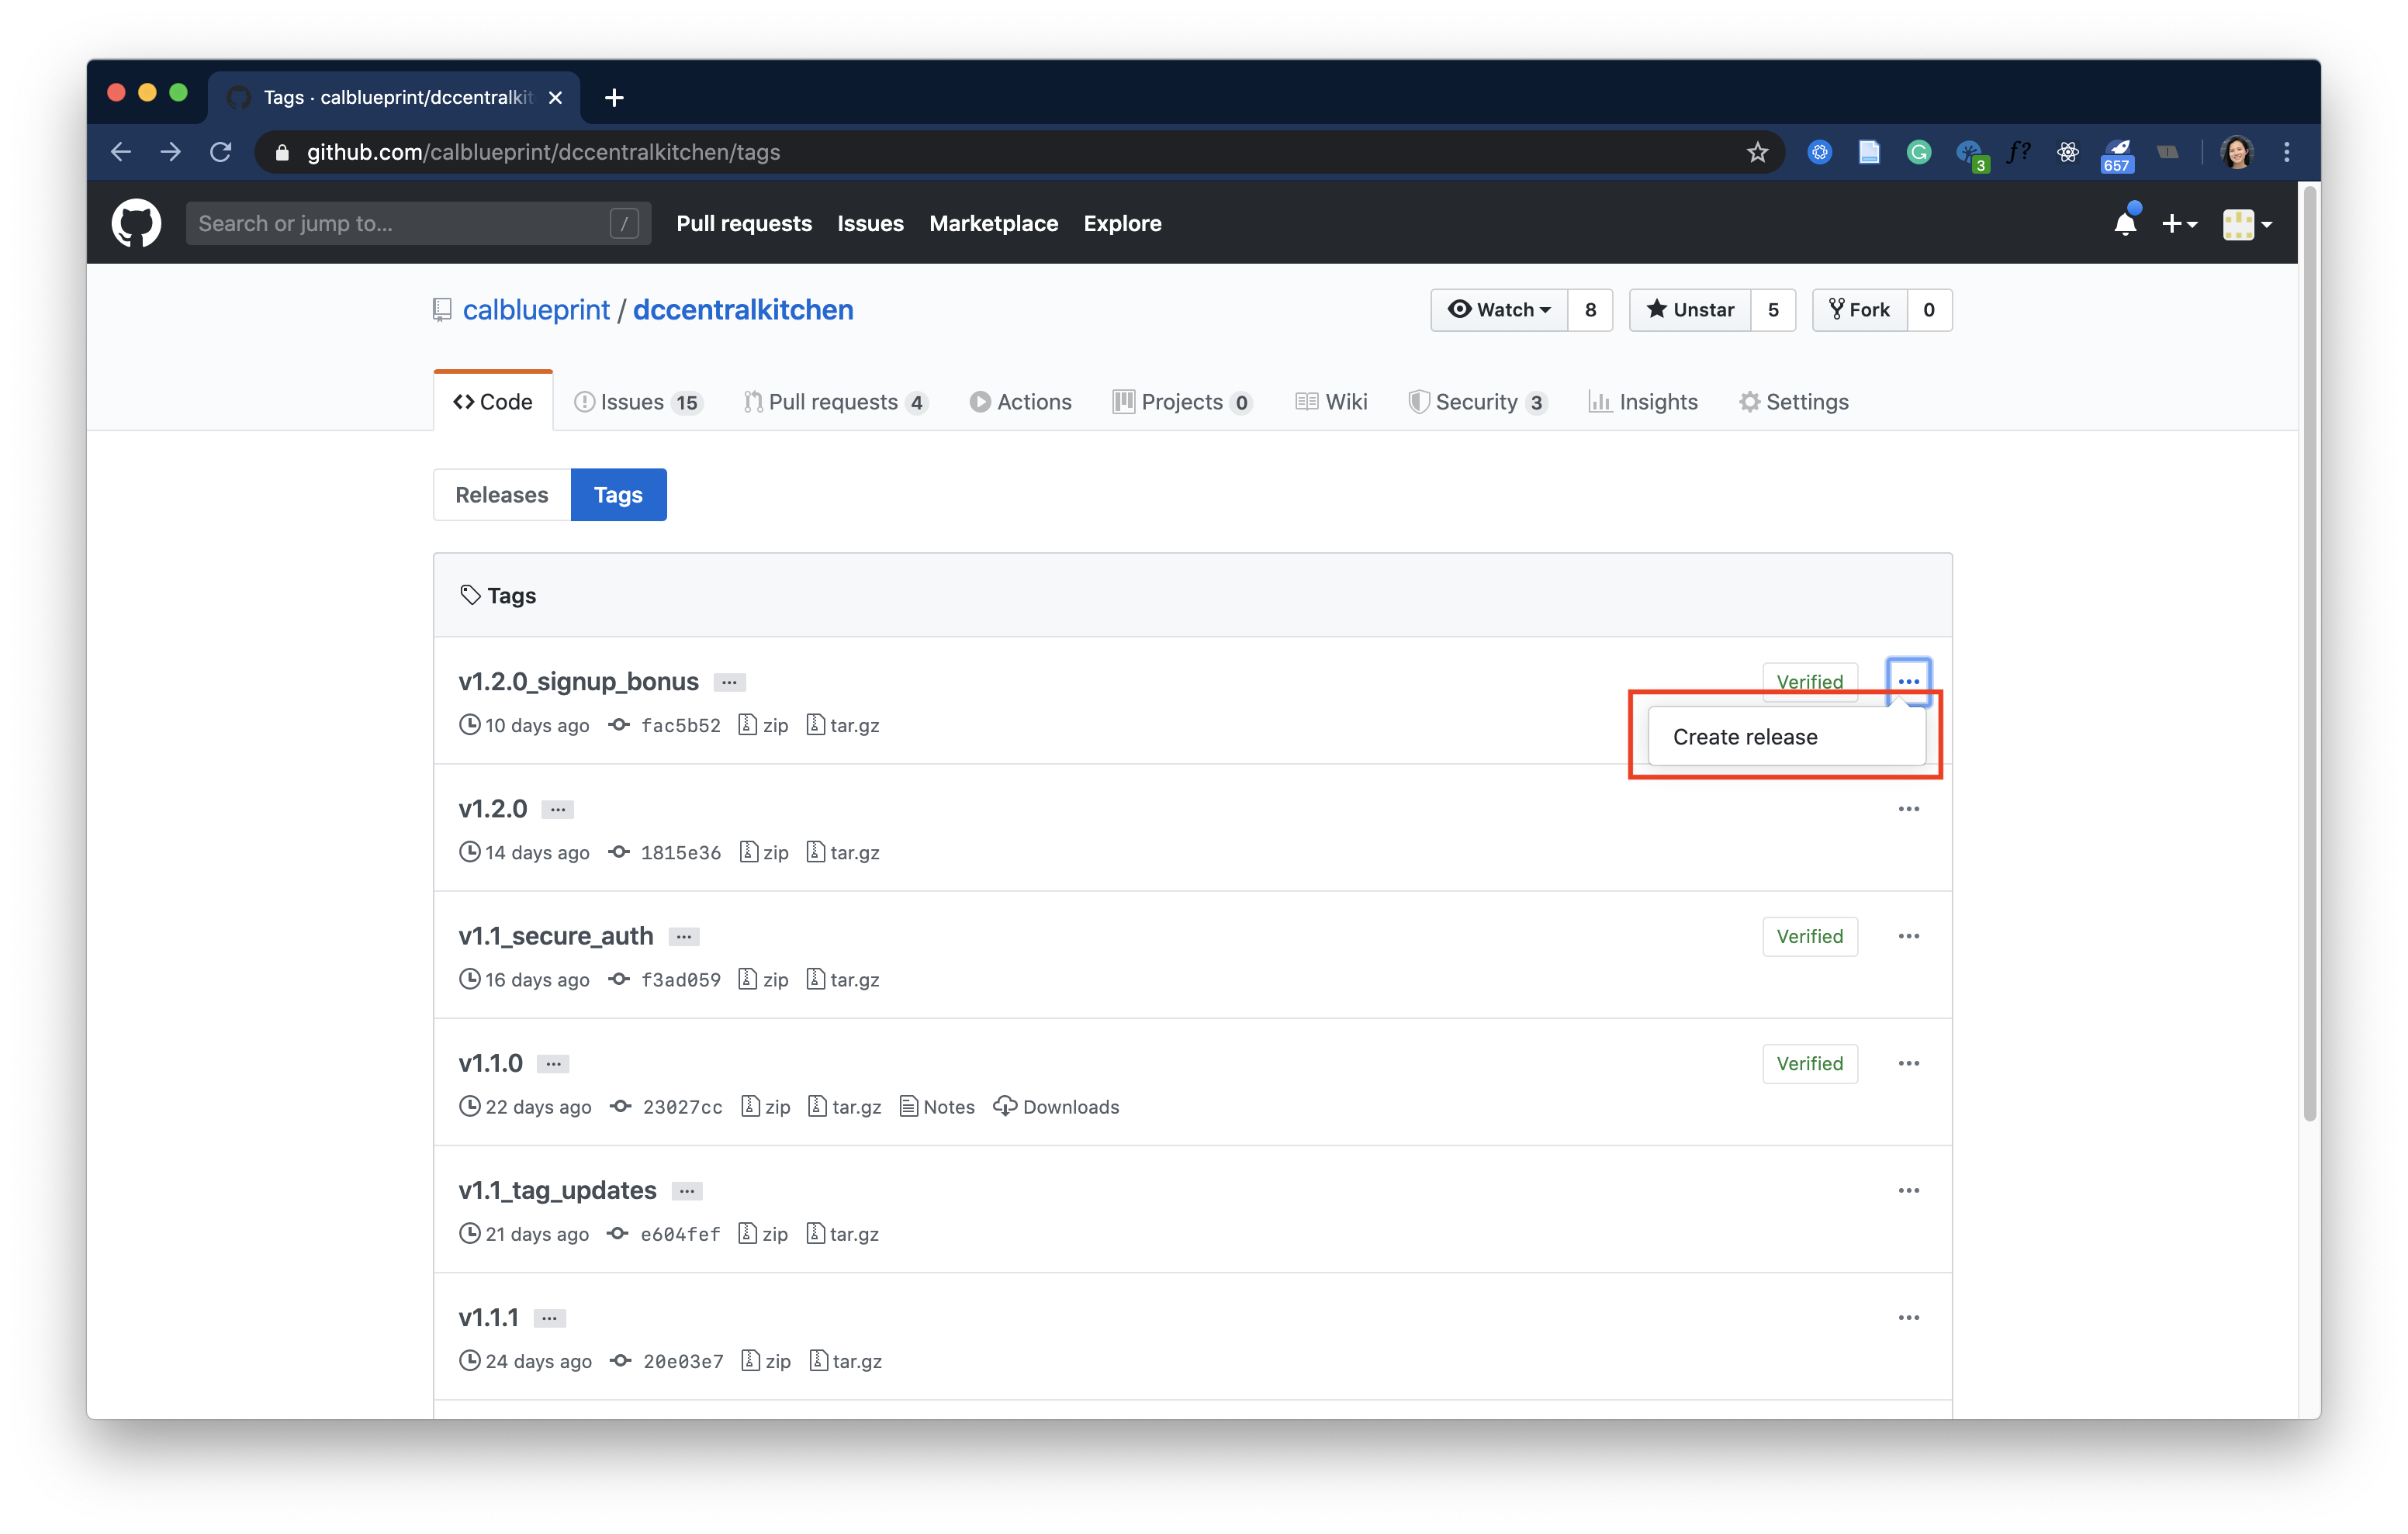
- In Release Title, enter the SemVer code from
versioninapp.json. In parentheses, add either OTA if the update was published OTA, or build if the update was published by a standalone build. - Add a description about the Features & Improvements and Bug Fixes.
Example: v1.1.0 (build)
# Features & Improvements
- Added styled map icons and transition animations in #87 by @tommypoa
- Integrated Sentry for error logging in #85 by @JustinMi
- Upgraded to Expo SDK 37 in #82 by @thumn
- Added COVID-19/Crisis resources section in #79 by @kennethlien
- Upgraded to React Navigation 5 in #76 by @thumn
- Added Guest Mode in #74 by @kennethlien
- Set the default store and added re-center location button in #72 by @tommypoa
- Updated styling and navigation in #45, #46, #56, #64, and #83 by @wangannie
- Updated product card details in #50 by @tommypoa
- Added external links to navigation directions in #47 by @wangannie
- Refactored Airtable in #48 by @anniero98
- Updated Log In and Sign Up flow with Material UI text fields in #48 by @anniero98 and @tommypoa
# Bug Fixes
- Fixed map issues that would crash the Android app in #92 by @wangannie
- Fixed Android styling bugs in #78 by @wangannie
- Made the bottom drawer responsive to screen size in the map screen in #71 by @tommypoa
- Fixed long store names pushing the See Products button off the screen in #51 by @tommypoa and @wangannie
- (Only for new build updates) Upload the .apk and .ipa files downloaded from Expo
- Select Publish release
# Helpful Links
Github Docs: Managing releases in a repository (opens new window)