NOTE
This documentation is the same for both the customer and clerk applications.
# Overview
React Navigation 5 offers a completely new API based on components rather than JSON-serializable objects.
# Relevant files
AppNavigator.js
navigation/stack_navigators
DrawerContent.js
# Existing stacks
Currently, the following stacks exist:
AppStack(AppNavigator.js): Screens accessible within the app, as provided by drawer tabsAuthStack(stack_navigators/AuthStack.js): Deals with authorization screens like sign up and login
Customer app only
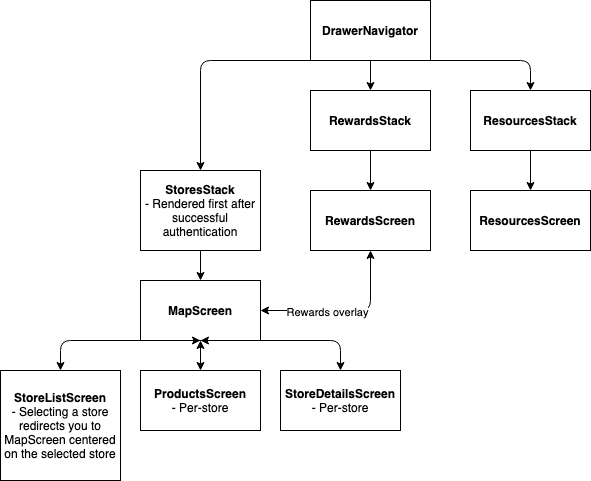
NewsStack(stack_navigators/NewsStack.js): Currently unusedResourcesStack(stack_navigators/ResourcesStack.js): Points to the resources screen, accessible via the drawerStoresStack(stack_navigators/StoresStack.js): Screens related to store lookup, such as the map screen, store list, products screen (per-store basis), and store details screen (per-store basis)
# Flow diagrams
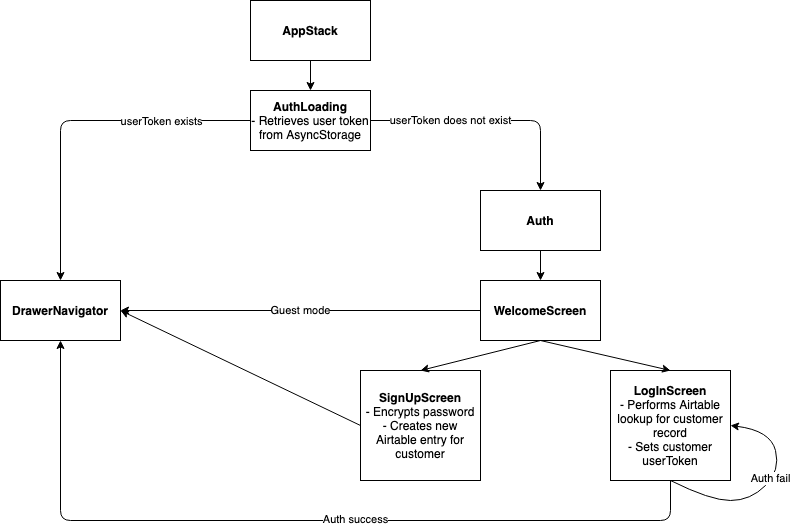
# Customer app flow
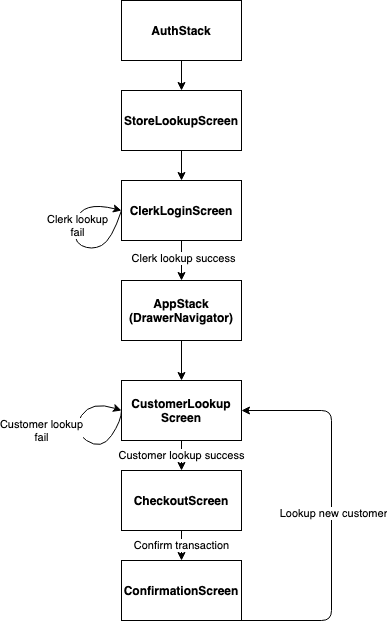
# Clerk app flow
# Adding a new stack
TIP
Refer to documentation on adding a new stack (opens new window)
Create a new file under stack_navigators .
import { createStackNavigator } from '@react-navigation/stack';
import React from 'react';
import { Platform } from 'react-native'; // for config
import NewScreen from '{new screen path name here}';

const NewStack = createStackNavigator();

export default function NewStackNavigator() {
  return (
    <NewStack.Navigator
      screenOptions={{
        drawerLabel: 'New Screen',
        headerShown: false,
        cardStyle: { backgroundColor: Colors.lightest },
        config,
      }}>
      <NewStack.Screen name="NewStuff" component={NewScreen} />
    </NewStack.Navigator>
  );
}
# screenOptions
drawerLabel: The label that you want to appear on the drawer in the app, if applicable (i.e. you will be adding this stack to the DrawerNavigator)
headerShown: prevents default header from being displayed in app, should set to false for style consistency purposes
config: Add this to your stack files.
const config = Platform.select({
  web: { headerMode: 'screen' },
  default: {
    headerMode: 'none',
  },
});
# NewStack.Screen
name: What you will refer to your screen as when navigating between screens in the app
component: The name of the screen component being rendered
# Adding a new screen
- Create a new screen component (i.e.
NewScreen) - Import screen to corresponding stack navigator and pass in as screen component under the stack
NOTE
We've had a lot of issues with class components conflicting with our need to use hooks (i.e. useEffect or useFocusEffect), so it would be best to make a functional component from the get-go and avoid using deprecated methods like componentWillReceiveProps in classes
# Adding a tab to the drawer (hamburger menu)
No actual edits need to be made to the HamburgerButton when changing the drawer. The drawer relies on React Navigation + Drawer, so all the button does is call toggleDrawer.
Import and pass in your new screen or stack to the DrawerNavigator
<Drawer.Screen
  name="New"
  component={NewStackNavigator}
  options={{ title: 'New Screen', swipeEnabled: false }}
/>
NOTE
name : how we will reference the stack or screen when navigating within the app, if necessary to define
title: string that can be used as a fallback for headerTitle (docs (opens new window)), NOT to be confused with drawerLabel (we don't really need this if we don't have a header)
Styling for the drawer can be found in DrawerContent.js.
# Adding a link to the drawer
TIP
The external links in the hamburger menu can be modified without updating the code by updating the redirect URL of the short-links. See this table for a reference on the existing links in the hamburger menus.
These links are basically hardcoded and not passed in as props from the DrawerNavigator to DrawerContent. To add functional buttons (such as the LogOut button), add a styled TouchableOpacity and have it and call a function in onPress.
<TouchableOpacity
  style={{ padding: 16 }}
  onPress={() => action()}>
  <Title>New Link</Title>
</TouchableOpacity>
Refer to "Report Issue" and "Log Out" buttons for more details in DrawerContent.
# Navigating between screens in the app
This is an example from StoreCard.js upon clicking the search bar to navigate to StoresList:
navigation.navigate('Stores', {
  currentStore: store,
})
The first argument, 'Stores', is the name of the screen you want to navigate to.
The second argument refers to props we want to pass in between components. In a class component, this is accessible via this.props.route.params.
const store = this.props.route.params;
In a functional component, this is accessible via the component parameter route.
const store = route.params;
For more details on parameters in components, visit this doc (opens new window).
In a functional component, you can use the useNavigation() hook.
const navigation = useNavigation();
You can also pass navigation to a functional component as a parameter.
In classes, you can get navigation through props.
<NavButtonContainer onPress={() => this.props.navigation.goBack()}>